Wood-Mizer Bandsaw Tooth Setters for Efficient Sawmill Blade Maintenance
In the process of sawmilling, bandsaw blades do a tremendous job of cutting a log into valuable building material. To produce the best quality cants and boards out of every single log, you need to properly maintain the bandsaw blades by sharpening and setting their teeth. Only well-maintained bandsaw blades guarantee ultimate cutting performance.
Setting Teeth is Just as Important as Sharpening
For bandsaw blade maintenance, both sharpening and setting are equally important. As the blade teeth get dull and deformed during sawing, they need regular sharpening to restore their sharp edges and the gullet shape. Secondly, every bandsaw blade needs to have the teeth set to produce the material with a high-quality surface and effectively remove the sawdust from the milled log. The bandsaw blade has the correct teeth set when they are precisely and consistently “offset” from the blade body.
The pattern of tooth setting is “left/right/straight,” where the left and right teeth are for opening or cutting the material, and the straight one - the so-called raker tooth - is for removing sawdust from the timber. The recommended tooth-set values are different for each blade type and profile. It’s essential to adjust the tooth set value to the kind of wood you’re going to mill. For example, we recommend using a smaller tooth set for hardwood, and for softwood, we recommend using bigger. You can find the exact recommended values on the bandsaw blade box.
If the teeth are set too little, the blade cuts straight and with good quality, but slowly. If the setting is too much, the blade will cut with jerky movements, producing wavy cuts and generally deteriorating the quality of sawn timber. The sawmill blade with incorrectly set teeth may quickly overheat, eventually causing breakage.
Before starting the process of tooth setting, the operator needs to prepare the blade correctly. First of all, you need to clean the blade and remove any resin, oil, sap, or other fluids. Secondly, it needs to have the edges deburred, either manually with a deburring tool or automatically on the sharpener like the BMS500/600.
Choosing the Tooth Setter
Wood-Mizer offers a broad range of bandsaw blade tooth setters allowing for fast, precise, and consistent setting of teeth.
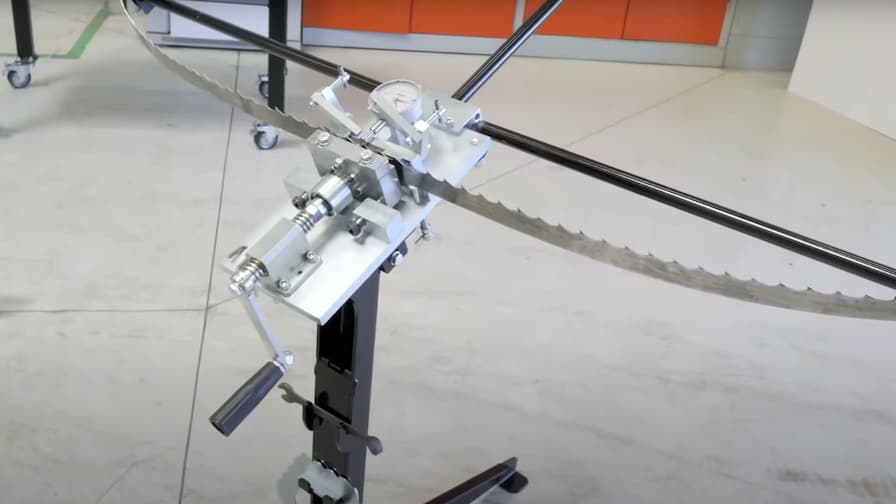
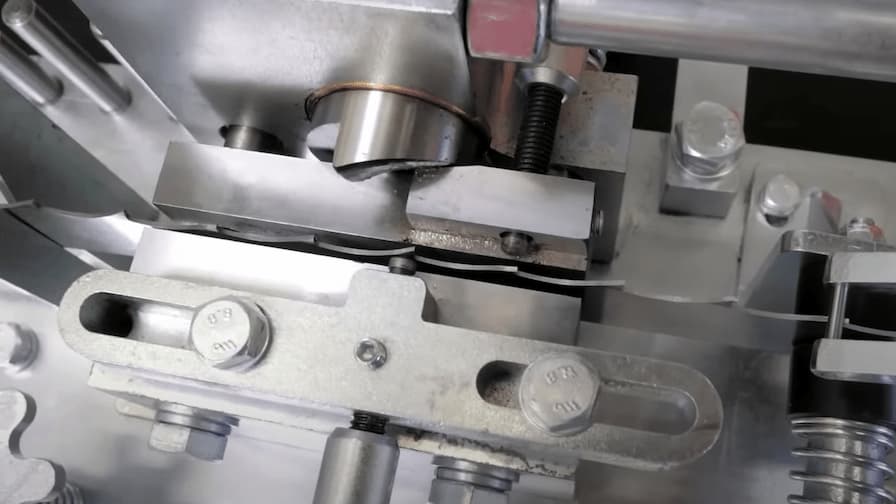
The BMT100 – Manual Single-Sided Tooth-Setter is an economical, precise, and easy-to-use tool for low-volume operations. This device works with 25-75 mm wide blades and is operated manually (with one hand, you set the teeth by a crank handle, and with the other hand, you advance the blade). It sets the teeth on one side of the blade at a time, so you need to remember to turn over the blade to the other side once you’ve set the teeth on the first side. To preserve the correct tooth setting pattern, you have to set every 3rd tooth on the blade. As the setter is manual, the setting of one blade takes on average 7-10 minutes. The BMT100 allows for a very accurate tooth setting.
Before starting the process of tooth-setting with the
BMT100, you need to:
1. Adjust precisely the height of the blade in the clamp – Wood-Mizer recommends setting the bottom of the gullet 1,0-1,5mm below the top clamping edge,
2. Adjust the setpoint – Wood-Mizer recommends setting the point on the tooth at one-third of the tooth height from the tooth tip,
3. Reset the dial indicator.
It’s essential to adjust the correct position of the stopper, which stops the blade and sets the right point for bending the tooth. A dial indicator shows the value of the tooth set. And the support arms holding the blade need readjustment depending on the blade width.
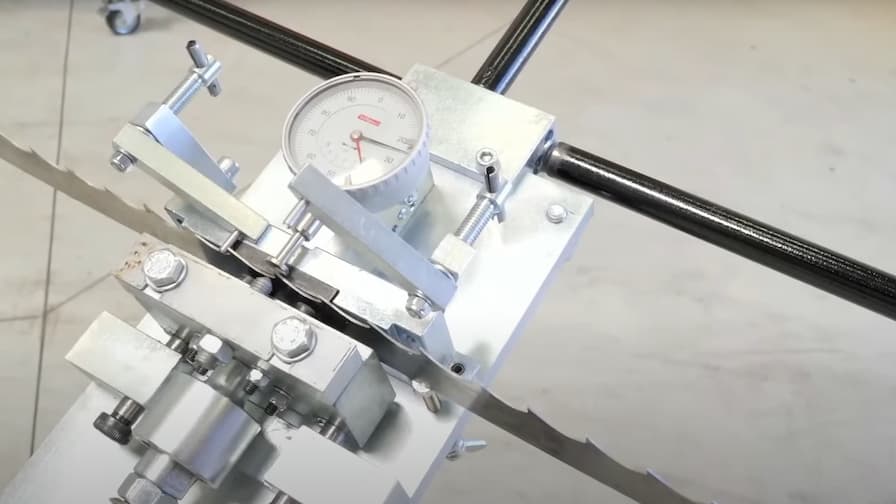
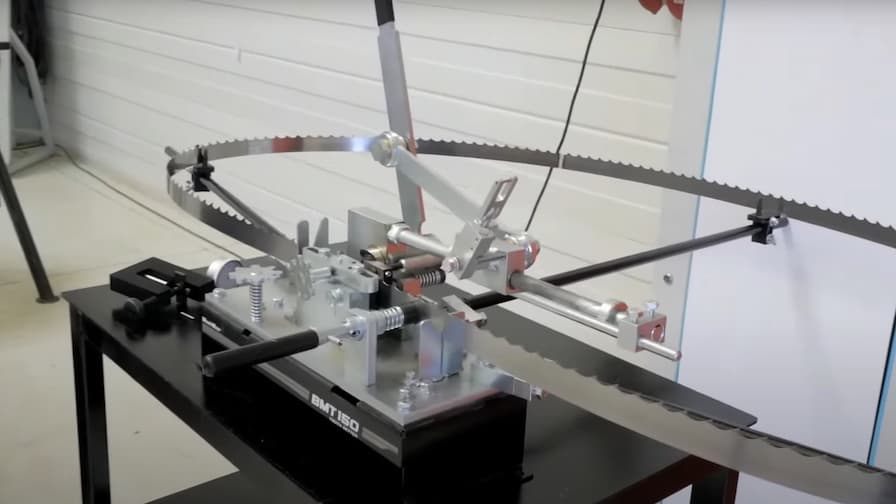
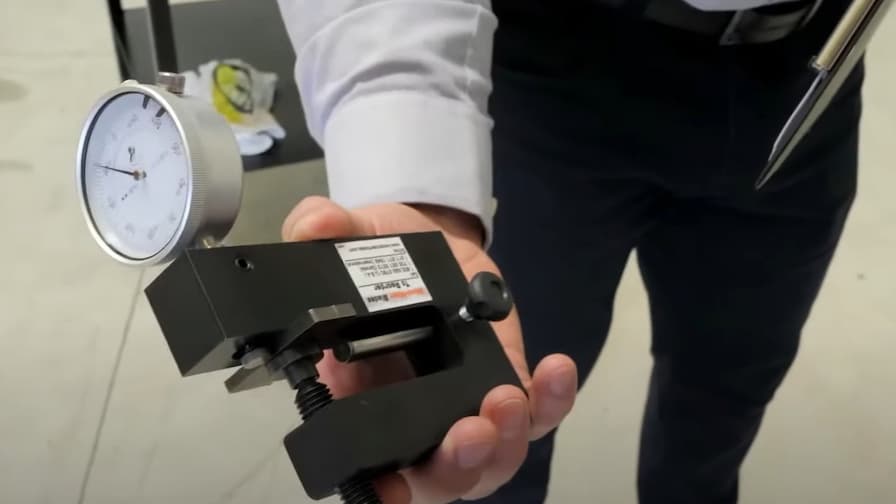
The BMT150 – Manual Dual-Sided Tooth-Setter is another economical, precise, easy-to-use, and efficient tool from the Wood-Mizer lineup. It’s dual-sided, so it sets two teeth at one time (left/right) and doesn’t require the operator to invert the blade. This setter allows preparing blades 25-75 mm wide with tooth-spacing of 6-32 mm. To maintain one blade, you need about 3-4 minutes. It’s operated manually by a ratchet lever that activates 2 set bolts and simultaneously advances the blade with a pusher. Adjusting the height of the blade is done by replacing the pins and a knob for fine adjustment. For ensuring the highest precision of tooth-setting, the BMT150 has a “Set Master Gauge” tool for checking the value of tooth-set and precisely adjusting the set screws.
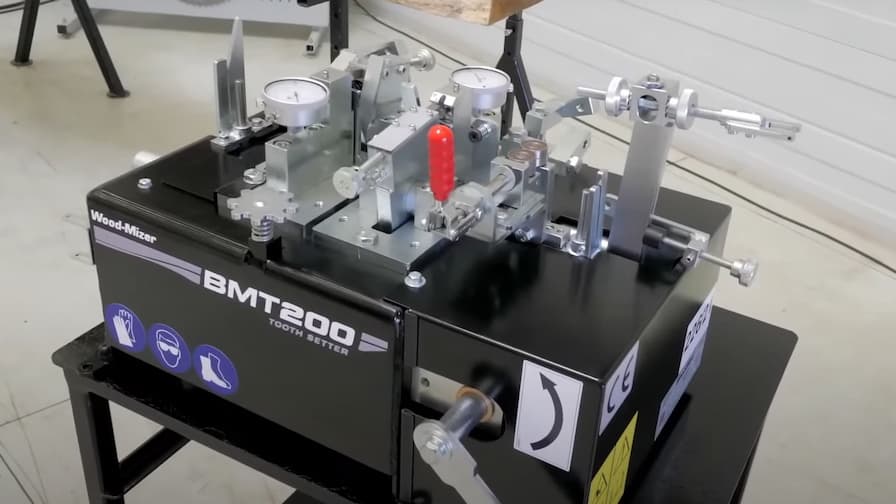
One of the most popular Wood-Mizer tooth setters is the BMT 200/250 – Dual-Sided Tooth Setter, which is available in two versions. The simpler version, BMT200, is manual, equipped with a crank handle that activates the set bolts and advances the blade. You can upgrade the BMT200 with an extension kit to a higher version, the BMT250.
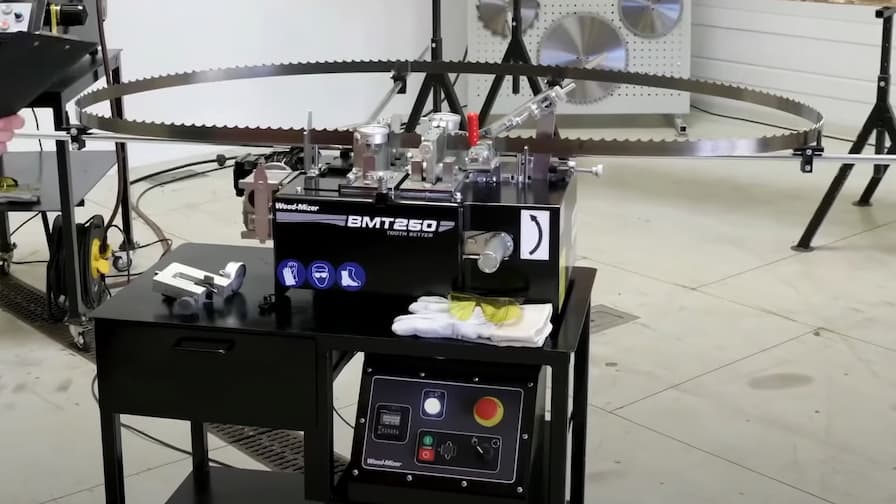
The electric version of the BMT250 has a 1-phase 0,18 kW motor with a gearbox and a simple control unit. There are two teeth set in one cycle in this tooth setter, which means that the process is faster. On average, it takes about 2-3 minutes to prepare one blade. The BMT250 tooth setter is often combined with the BMS250 bandsaw blade sharpener.
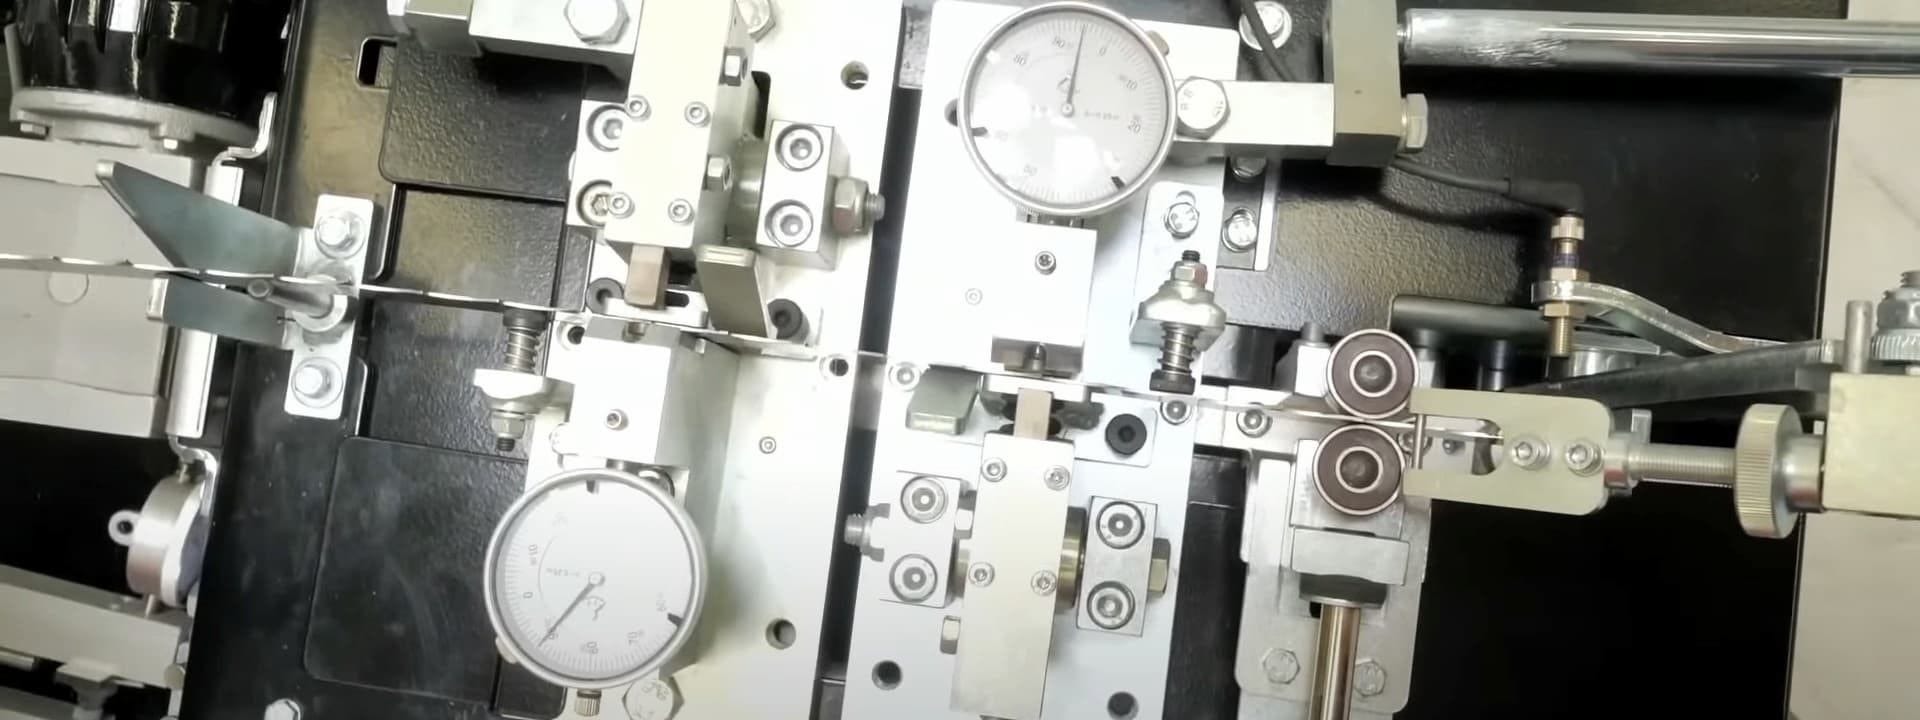
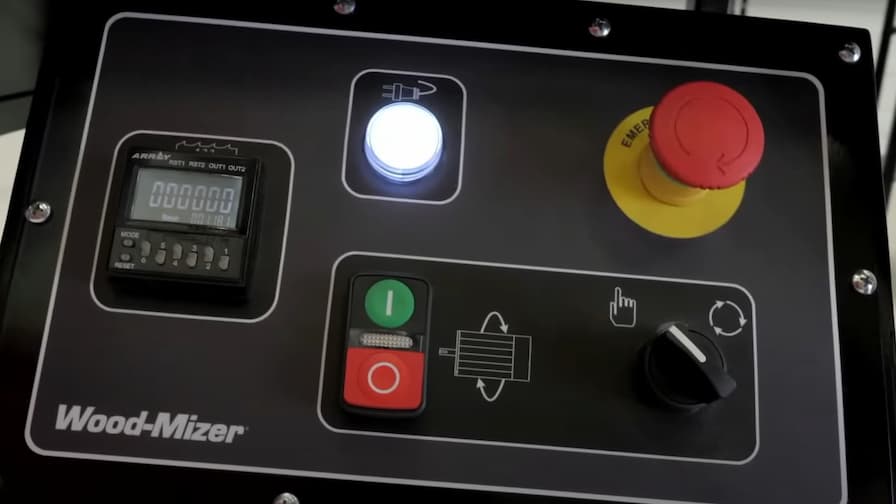
Each set bolt and the anvil are linked to a separate dial gauge, which needs to be calibrated before starting the setting process. Two dial gauges show the set values – one for the right and one for the left offset. It’s a good practice to use the Set Master Gauge to double-check the setting from time to time. The electric version of the BMT250 has a simple control box with the teeth counter, on which you set the number of teeth, and the sensor will stop the process itself. Additionally, the BMT250 has a voltage indicator, the main switch, and a manual/automatic operation mode switch. With the BMT250, you can set 25-75 mm wide blades with a 13-32 mm tooth-spacing.
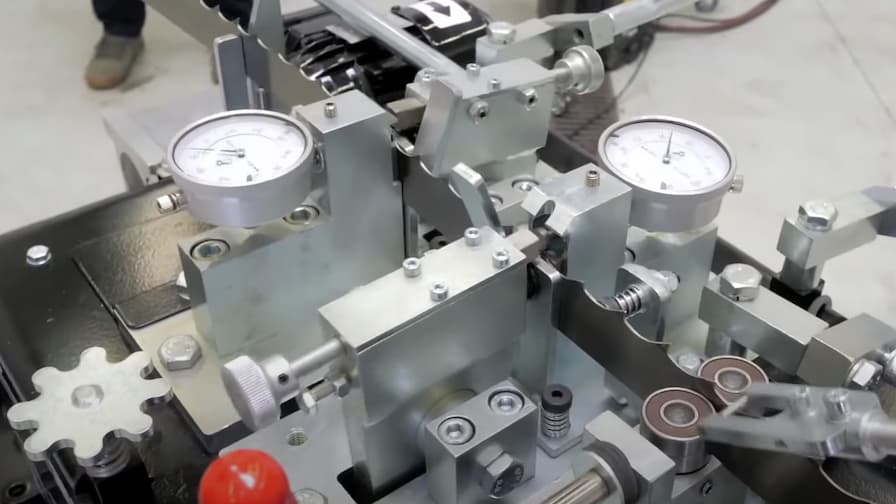
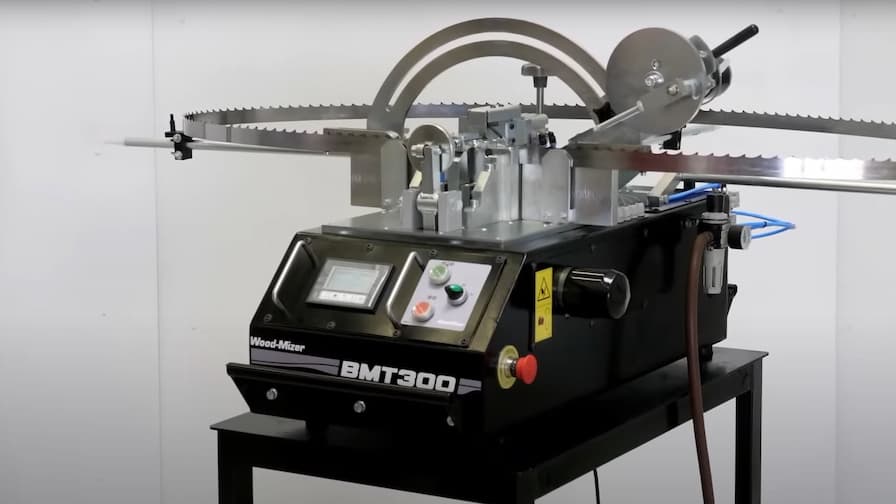
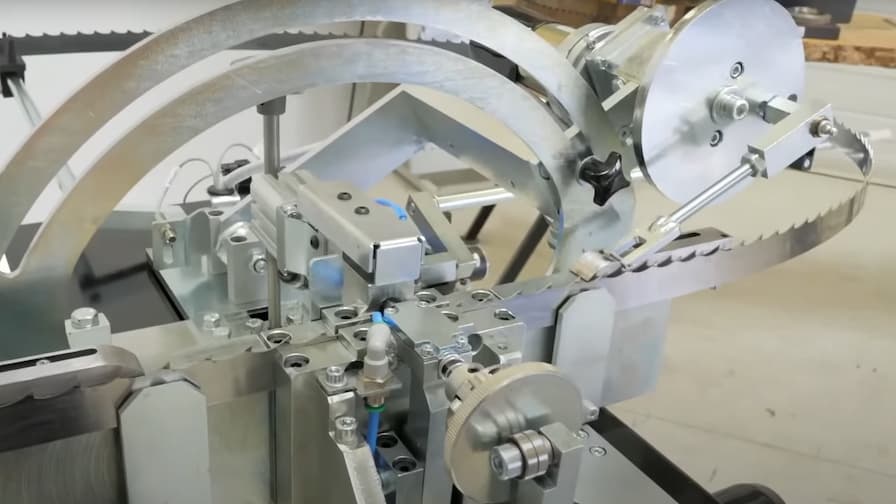
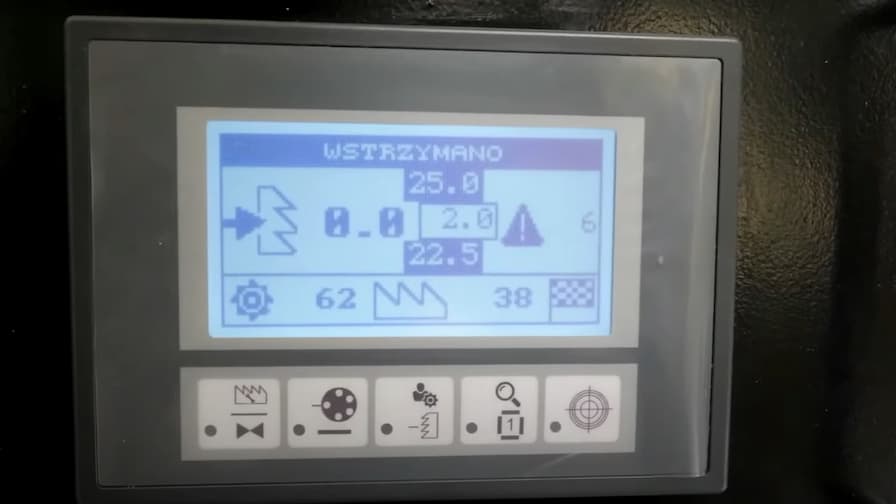
The BMT 300 – Pneumatic Single-Sided Tooth-Setter is designed for professional and high-volume operations. It’s often combined with the BMS500/600 professional bandsaw sharpener. The BMT300 is an automatic tooth-setter that works in several operation modes, uses various diagnostic functions to inspect the machine components and the correct tooth set. If necessary, it can fix over-set teeth. It uses two sources of energy: the electric motor (2x) 24V DC for powering the blade pusher and the advance mechanism, and the compressed air (min. 4 bars) for powering the clamping tool, set bolt, and the cleaning nozzle. The BMT300 tooth-setter is single-sided so that it sets only one side of the blade at a time, which means you will need to invert the blade to set the other side as well. It’s extremely precise, keeping the tolerances required by the user, and it’s fast - 3 min to prepare one blade if the blade doesn’t have any teeth damaged by a nail or a hard fragment of wood.
On the control panel, there’s an LCD screen with several buttons for operation. It shows all the parameters of the process, which you can adjust in real-time. From here, you enter the number of teeth/cycles, upper/lower limits of tooth setting, type of clamp used, maximum number of set pattern errors, unit of measurement, user language. You can also browse the diagnostic menu and run the tests checking the functions of the machine (pusher, clamp, curve, set bolt, sensor); from here, you also run the calibration mode or tooth-set inspection mode.
Tips and Advice for Smart Tooth Setting
Before starting any blade maintenance, make sure you’ve prepared the sawmill blade and the machine for it. It’s important to remember a few general rules of setting the teeth and maintaining the setter.
1. Set the teeth only of the blades cleaned from resin, sap, oil, or dirt. Otherwise, the process won’t be as precise as expected and will put an additional wear-and-tear on the machine.
2. Adjust precisely the height of the blade in the clamp - set the bottom of the gullet 1,0-1,5mm below the top clamping edge, adjust the setpoint - set it at one-third of the tooth height from the tooth tip, and reset the dial indicator.
3. Observe the pattern “left/right/straight” when advancing the blade on manual tooth setters. Not following the correct set pattern on the blade will take much work and a long time to restore.
4. Use the Set Master Gauge as an additional measuring tool to double-check the values and readjust the setter if necessary.
5. The tooth set values depend on many factors. The best practice is to take the recommended values (at the box of bandsaw blades) and treat them as a point of reference for testing on your own. Once you get more experienced, you’ll learn what tooth set value works the best for your sawmilling operations.
6. Inspect the blade clamps of the setter, check the condition of the pusher advancing the blade, check and replace any movable parts of the machine on time.
7. Store your setter in a clean and dry environment. Remove dirt, sawdust, wood chips, and other debris at the end of the work shift.
8. “Safety First” – Do not disregard wearing gloves for handling sharp objects, safety glasses for protecting your eyes, and earplugs for blocking harmful noise. Read user manuals and follow the instructions provided by the manufacturer.
Follow these tips and recommendations, and you will enjoy a long and successful operation of your Wood-Mizer bandsaw blade tooth setter.
***
Get a Free Ebook
Find out how to improve your blade performance and extend blades lifetime. Subscribe to our newsletter and get an ebook covering the ten most important topics on bandsaw blades and links to useful videos.